Wednesday, November 30, 2011

Playing Catch Up

OK, So I was AWOL for a while over the Thanksgiving break. I did dabble in doodling and did a little applique, but not a lot. Since I've been back I have been feeling 'out of the groove' with my tangling. I have totally fallen in love with Socc, the new pattern that was presented at Tangle Patterns. Oh, its like magic how it transforms. I have been working on breaking down a couple of patterns inspired by vacation things as well.

First, lets get to the challenge from the Diva this week. BIGGIFY. This was an interesting excersize and I don't think I'm done yet experimenting with it, but I have one that I am fairly happy with. It is interesting because the pen line width does not biggify along with the rest of the pattern when you draw big so it totally changes the character of a lot of patterns.  It was a good thing to try for me right now because I have been drawing really small lately. The longer lines do take more concentration and are more easily accomplished when drawing on a table and not on my lap as I tend to do (because I am usually doing it on the go). Here is my challenge entry...

I was actually intending to use Socc in that middle section but was concentrating so hard on getting smooth lines I ended up doing the first section incorrectly so I just made the rest up. 'No mistakes' right?

I also have a lot of drawings to catch up on for Art Every Day Month since this is the LAST DAY! I missed a few days while away and spent several days working on sections of a single drawing, but there still seems to be a backlog...


I had those lovely repeating patterns on shells on my mind right before we left, as we were headed to a great snorkeling location. So, not really a tangle... but some of the patterns in the shells have that same feel to them.


This is the one I worked on for several days. Fife takes a long time when done on this scale! Magma is just the right pattern for the gentle ocean waves and I am sort of in love with Whirlz... it is very meditative and would translate really well into quilting. In fact there are several versions of this in the Free Motion Design Project over at Day Style Designs. 


I just kept adding to this one because I didn't like it. It was the first one I did entirely after we got back... not yet in the groove. I do sort of like the square border with the open spaces... I will have to work that one out again since it just grew a line at a time as I added things trying to get to something I liked. The feathery one is inspired by a free motion quilting pattern by Leah Day called Tongue of Flames. This is a lot bigger than I typically have been practicing it so this is sort of a precursor to my BIGGIFY challenge entry. Leah's pattern and a video of her quilting it can be seen here.


In this one I tried another new pattern I picked up at Day Style Designs Free Motion Quilting Project,  Fossil Snail and used Whirlz as a line treatment instead of a filler.


This one I just did early this morning. Finally a chance to use Socc! And another example of Tongue of Flames and a new-to-me tanlge, Esses. 

Monday, November 28, 2011

What's on my wall today?

There isn't much new on my wall, but there is a lot on my to do list! While I was gone on vacation I did manage to finish appliqueing the Grandmother's Flower Garden doll quilt body to the borders I whipped together before we left. I think it will be bound in green and I need to come up with something for the backing so I can start quilting it.

We were gone snorkeling and having ocean adventures for 7 days and had a great time. Lots of pattern inspiration for both fabric and Zentangle and maybe next week I can layout all the batique fabric I have been saving up for my coral and fish quilt that I am planning in my head and feature it in a Design Wall post. I still have to finish my Hearts of Gold crumb quilt too, along with a few other Christmas presents. Word on the street is that my daughter will be asking Santa for a new dress for her rag doll that I made her last year so this little elf better get busy! For more of what other quilters are up to this week head on over to Patchwork Times for Design Wall Monday.

Later this week I hope to post a few of those new zentangle-ish patterns inspired from my travels. Of course, I will also be checking out the weekly challenge over at The Diva's site and trying to lay my hands on a actual Zen Tangle Tile so I can participate in the Red String Challenge. Have a great Monday!

Wednesday, November 23, 2011

One last fun art exersize for both child and adult

OK, I promise, this is it. This was one of the other activities in the 'art in the park' activity I did with my boys a few years back. They were given a white paper and a fine black permanent marker and told to do loopy or zigzaggy lines all over it, leaving some spaces between. Then they got watercolors and brushes and were told to fill in some of the spaces between the lines with color, whatever spaces and whatever colors they wanted. These turned out to be pretty cool looking. Again, I cut out the 'best' parts that had good composition and matted them with card stock for use on note cards.

In this case we used rub on words and the boys used them for teacher appreciation notes one spring. I think they turned out great. It looked like so much fun I did several sheets of paper as well. In a way, the black line is much like a zentangle string. In my case I did not fill in as much of the space as the children did, but left a significant amount as 'negative space'. The overlapping and interlocking shapes leave lots of room for color transparency and overlap experimentation. Having no formal watercolor training leaves me lots to explore when it comes to my paints.

The youngest boy did this one
These cards have been so useful as things to have sitting around ready to fill in when needed. A few rub on words can set the tone, or you can get the appropriate tone or season from the colors used in the card. I think the same large string technique could be used to incorporate both tangle patterns and watercolor to achieve a different kind of look as well.


This one looks like spring to me

That is all of the card talk I have on my mind right now. I hope everyone has a wonderful Thanksgiving holiday (for the US residents) and I will be back to posting quilting news and zentangle attempts next week!
I like to play with the 'temperature' of a range of colors

Tuesday, November 22, 2011

More card talk

It is no secret, kids love to make art.  I absolutely think they should be encouraged and praised for the self expression... but what do you DO with it all? I have a couple of walls in my house with arrays of inexpensive frames from Ikea that fit a regular piece of paper, with minor trimming, easily. That is where a lot of it goes. I have a few noteworthy pieces from school art class framed and matted in "real" frames. I have discovered another use for certain types of art... I have used certain kinds of art to make very modern looking black cards (for mailing as 'Thank You's etc). We had attended an "art in the park" experience and the boys were introduced to modern art and invited to splatter, swipe, roll and smack paint onto the backs of donated posters. They turned out great, but they were huge and some areas were more expressive than others. So, after storing them behind a bookshelf for a couple of years, I came up with this idea. I cut them up, somewhat at random, somewhat by eyeing what the best compositions would be and chose card stock paper to compliment the colors in the painting as narrow mats. With a little ink on the edges and some torn edges in a few cases to add interest they came out looking like something you might purchase at the gift shop in the art museum.  These are just a couple of examples.


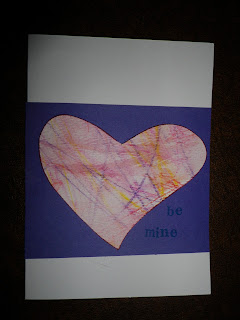
On a nice white card with rub on letters as greeting if appropriate they make smashing cards that are a far cry from the ordinary. And each one is an original work of art!  I have since encouraged them to make this sort of thing for specific purposes. One Valentines Day I gave my 18 month old daughter pink, purple, yellow and red water color pencils and a sheet of watercolor paper. She had a great time scribbling. Then I gave her a wet kid's paintbrush and she 'enhanced' her art work. When the whole thing was dry I cut out freehand hearts from the paper, inked the edges, mounted them on cards and added stamped letters... Valentines for the grandmothers and great grandmothers from their favorite baby girl!


I think a lot of kids art work could be treated this way with great results. It might even teach the kids that sometimes it is OK, even preferred to send a snail mail greeting to a loved one rather than an email or a text. And don't even get me started on the need to remind them about the importance of thank you notes!

I have one more art/card idea to share, and then I will get back to the regularly scheduled programming of quilting and zentangling!

Monday, November 21, 2011

Don't you just love leaves this time of year?

I am mourning a little... the rain and wind of the past few days has taken a toll on the pretty leaf population in my part of the world. We had an excellent year for them and the maples planted around my property have finally begun to color up the way they should. With the hickory that grow here naturally it is a great combination... like summer sunsets that last for a few weeks.


I should have found time to do this craft with the kids earlier this year but we had an exceptionally busy fall and I didn't. A few years ago (pre child #3 who is now 3 years old!) I gathered some leaves while they were still supple and pulled out the craft acrylic paints and the vinyl table cloth and the boys and I went to town. We painted on the leaves and then used them to 'print' with and the boys used the leaves themselves as paintbrushes. They had a great time and made some interesting art. As always, when I do this sort of thing with them I have to make my own (so I keep my nose and influences out of their art!) I chose to print with the leaves on pre-made blank cards. These are a few of the printed cards I have left. I have used many of the best ones as greeting cards over the years.

An interesting thing happened when I had printed with the same leaf for a while... the older, drier layers of paint on the leaf would soften  from the wetness of the new layers and peel off when the leaf was printed with again. This gave a layered and ragged look I was not expecting (see the tulip poplar print below on the right).  I really liked it and there was no real way to 'control' the effect which made it exciting and organic, if not a bit frustrating at times. I think if I were to do it now I would use plain card stock 'blanks' cut to a size that would allow me to mat each print with colored card stock before mounting it on the card.

It is a fun way to make yourself some lovely greeting cards (somehow pretty fall leaves make for a  lovely condolence card) and celebrate the changing leaves in your town... and make the look last a bit longer too!

Come back and visit soon for another card making idea... this time with all that 'kid art' you don't know what to do with but can't bear to get rid of!

Wednesday, November 16, 2011

Tangling the month away

I have been keeping up fairly well with my Art Every Day commitment, even if I don't post about it everyday.

Check out all the fun everyday this month at Creative Every Day

Some days it is sewing for 15 minutes, some days it is half a zentangle piece, some days it is more... but it IS happening!  The past few days it has taken the form of working on an entry for this week's zentangle challenge over at The Diva. She also has a fabulous giveaway going on until Nov 30th so be sure to check that out for all sorts of tangling goodies. I was really intrigued by this weeks' challenge which is to use three different geometric shapes as a string to fill in with new-to-you patterns. I had already been trying to incorporate at least one new tangle pattern into every piece and I am always stuck for string inspiration when starting a new work so it seemed perfect. It was harder than I thought! I guess there are reasons I gravitate toward certain tangles (I like the way they come out when I do them) and away from others (my results with them are horrible!) I was also having a couple of off days, even things that work pretty well usually were not coming out well. So here is my entry for the challenge, it is also Art-Every-Day-Month #15.


I like certain things about it... its regularity, its ballance, but it seems pretty constrained and the 'string' is still VERY obvious. There is no overlap in the pattern areas... for all of it's order and neatness, it is a little bland.  All the tangles are new to me, learned for this challenge: waves, claws, scrawlz, quiltz (my version), petunia, verdigogh. I did resort to using an aid to get nice circles since it was a big element. I hadn't been happy with my close-but-no-cigar attempts on other tiles. I do like some parts of the other attempts, AEDM13 and 14 respectively. New tangles include: knit, propell, floatfest, oke, whirlz (LOVE this one!), pokeroot, phud, verdigogh, misst, waves, flez, claws, petunia (can't you tell I've been visiting Helena's flickr stream!) and Fricle.


See, lumpy circles, odd shapes, wavy lines that are supposed to be straight... just 'off' for me. I almost think it would be better to do the shapes 'wonky' on purpose and not try to get them super regular and miss. I think I will try that next because this type of string is sort of an interesting challenge.


The final piece was one done on Friday and Saturday (previous to the posting of the new week's challenge) and inspired by the cave formations I saw on a field trip with my middle son on Friday morning. Three of those patterns are new to me and I am not even sure if two of them are patterns I saw somewhere, or something that morphed into being from my own head (the far left filler and the filler in the left hand 'drip'). I guess the left hand drip is sort of 'black pearls' in a grid and the other may be sort of a combination of archer and flukes. The others moving to the right are Sanibelle, marbles, tripoli and echoism. The other at the top left I really like and use all the time, but I can't recall the name right now. I suppose I should take the trouble to find out!


So that is what I am up to so far this week. The rest of the week will be devoted to getting ready for the holiday week coming up here in the US... and tangling and sewing when I get the chance of course!

Monday, November 14, 2011

Fabric choices and a technical quandry

Good morning! I have hexie news today! I am within a few green hexies of finishing the body of my small hexie project.  I need to choose a blue for the border, sew in a few blue hexies to fill in and then cut and sew on the border fabric. First things first... WHAT blue to use? I have, um, a few to choose from since blue is a favorite color around here and I have been collecting 30's repros for a while...


I have the blue versions of both the green fabrics I used (one is in the upper left corner and the other is not shown) as well as the blue version of the red flower centers (upper right corner). All of the fabrics shown have a very small second color to them, either red or yellow, pink in one case. I think from the photo the upper right corner fabric is winning out in my opinion. It has the right value to compliment the body of the quilt. I also like the  one at the far right and the one on the far left bottom. What do you think? I think I will look at them all together for a while, get your opinions and let it sit before I make a choice.

Now for the technical questions... all you hexie makers out there need to tell me how to proceed! I want the yellow flowers to have a complete (or pretty close) green hexie border around them surrounded completely by blue. I had planned on making the top and bottom edges straight (sewing across the points of the straight line of hexes) and filling in the 'dent' in the middle of the far right and left edges with three blue hexies. I think I will also need two blues in each corner to bring that out square. Then what? Should I unfold the seam allowances of the outer hexies and then sew a straight border strip on each edge? Should I just bag the whole sewing thing and applique the top onto a large piece of blue? Clearly, this is my first hex project and I am unsure how to finish it off! Advice please!

If you want to see what everyone else is up to this week hop on over to Patchwork Times for Design Wall Monday. 

Thursday, November 10, 2011

More Art Every Day

I have been enjoying having a small daily goal, artwise lately. I have gotten some exciting sewing done on current projects, but as always, it is an 'in progress' thing so not much to show yet. I have been keeping up with tangling too and this is the result. In the last post I included a drawing that I wanted to add color to. This is the colored version and the black and white...


I added the puddle at the bottom and I like  Dragnoaire as a leaf.  Then there are Art Every Day drawings 8, 9 and 10.  I am happy with the first two but the one from today (#10) is a bit of a ramble, no real focus or point to it. I feel that way a bit today, lots on my mind, lots I should be doing but little focus available to actually be doing it. 


I have a busy weekend ahead I hope to keep up with my art commitment. I will likely post on Monday with a weekend review.  Pop on over to Creative Every Day and see what others are up to. 

Monday, November 7, 2011

Art Every Day #4,5,6 and soon to be 7!

Gee, I have a little catching up to do!  Art HAS been happening every day, I just haven't had time to post about it.  Mostly I have been snatching moments to work on ongoing sewing projects, one in particular which you can see here. The rest has been learning new tangles from looking at a few other "Art Every Day" entries!  So here are the ZIA results of Art Every Day.


Nov 4 2011

Nov 5 2011

Nov 6 and 7
This one will get color today, but was drawn yesterday.

I also managed to sew some yesterday and get a few blocks done toward finishing my Crumb Quilt "Heart of Gold". I have also thought of changing or adding to the name and calling it "my quilting life... so far" because there are little bits of SO MANY other quilts that I have made. It is fun to go through and name off the quilts from which the scraps came and try to recall when they were made. Here are the latest blocks and a photo of the final layout of the body can be found here.


So that is the progress on AEDM over the weekend. Hop on over the Creative Every Day and see what other creative artisits have been up to so far this month.

Finally progress on the design wall!

Yea! I have some progress to show on the design wall today! I have been finishing up the blocks for the crumb quilt and finalized the layout of the main body of the quilt and decided on a border treatment. I can't wait to start sewing the body together! First I am trying to finish up more of the 4" blocks I need for the border. This is what the layout looks like so far.


The final 8" block and a few 4" I will add to my next post about Art Every Day (I have some catching up to do!). I can see the light at the end of the crumb tunnel... although I can't say that I'm all together happy about that. There is something about these little blocks that are SO fun to make!  Maybe I'll try to lead a class on it or something... it does seem to be catching on!  It will be a releif to get it off the wall and out into the natural light to get a decent photo of it! Hop on over to Patchwork Times to see what else is going on design wall-wise this week in blog-land.

Thursday, November 3, 2011

Art Every Day #3

So far so good with Art Every Day Month. I did some hand sewing on the hexie project I showed yesterday a bit today and did a couple of tangles while on the phone and sitting at the table with my daughter who wanted to draw/paint (if I don't sit there other things besides paper become her canvas... table cloth, skin... you get the picture). Not much new to show on the hexie project, but the tangles turned out OK. This one was inspired by one of the entries into the Punzel challenge over at I am the Diva a couple weeks ago. I had flipped through the slide show (here) and saw a take on it that made an impression. This version is still a bit awkward, but it would improve in its general line if I did it again I think.


Then I got really carried away with my paints. I do really like the direction this one is going in. It is more the style I would like to achieve in the range and type of tangles used. I may fiddle with the color a bit more and add some pencil shading, or I might do another one and start from scratch! I am using Peerless Transparent water colors and I love them! The background around Purk came from another visual impression from browsing the internet today. The Enthusiastic Artist posted her AEDM post for today which included this tangle, Jalousie. It came from yet another Zentangler, Stephanie Kukla. What WOULD we do for inspiration without the internet!

That is all for today. We shall see what tomorrow brings (and Saturday should be great since I have a 3.5 hour time slot to fill while I wait for my son to finish his Saturday enrichment class!). Catch you later.

Wednesday, November 2, 2011

Wednesday's creative pursuits

I actually got to sew today! So my 'art' today for Art Every Day are the new crumb blocks I made and the new layout I am testing on the design wall. I will also link this post to Jo's latest Crumb post over at Jo's Country Junction as she is the hostess of the Crumb Along that spurred me on with this project.  Along with this I have actual progress to report on my hexie project for both WIP  and One Flower Wednesday! Yea me!


So let's get rolling. These are the new crumb blocks that were made today. I have eeked out a few others, or parts of others in the past two weeks but these made it onto the wall from the sewing table today. I made/completed 4 4" blocks and two more 8.5" wonky stars. I have been contemplating how to finish this quilt off. I think I may put a 2" border of my accent color (gold) and a row of 4" crumb blocks all the way around. By my calculations, if it is a 7x7 layout of 8" finished blocks plus the 4" of border I should need 15 4" blocks for each side plus the 4 corners, for a grand total of 64 blocks. I started out with 40 4" blocks and have used maybe 20 of them for the wonky stars and a few 8" blocks. I need to get busy making more 4" blocks. Fortunately, they are fun to make, go quickly and use up lots of very small pieces!


This is the top half of the layout with a sample border. What do you think? I can stretch my border blocks by making some longer than 'regulation' like the line of flying geese shown above. That is a fun size to work on too. The gold border will be sections of various length of the gold fabrics I have in the stash (I think I will pull the orange square out of there... too distracting). More of this quilt can be found by searching for the tag "crumbs".

My hexie project has been creeping along. I did not get to work on it much this week, but it is showing progress. All full flowers and both half flowers are attached now (although both need an additional petal)  and I have a whole stack of  new green hexes ready to go. A blue border on this one is looking more and more likely, I will keep you posted!


Thanks for stopping by! I am enjoying 'making' myself work a little at a time at one of my many projects and passions on this, day two of Art Every Day!

Tuesday, November 1, 2011

New Month, New Week, New Challenge...

I learned only today that November is "Art Everyday" month. I would like to make that happen at my house... we will see if it does. I can try right? The guidelines can be found at the link below if you care to increase the creativity in your life, at least for this month.


Today, my art will be my entry for this week's Diva Zentangle challenge... "Halloween". I did several, the last one turned out like a more traditional tangle...
The background behind the pumpkin was inspired by the shapes of all the candy the kids brought home last night. For whatever reason I thought it needed a take on the pattern 'Barberpole' on the left. I have been wanting to add some water color to my tangles and I thought this was the perfect opportunity. I like the effect, although I have to say that watercolor paper is terrible about smudging the graphite shading! Next time I am going to wait until I am finished before adding that! And before you wonder... being the dork that I am, yes, I looked on-line to recall exactly what a pumpkin leaf looks like!

The other two are more ZentangleInspired Art-ish (ZIA-ish). Although this is more just a plain drawing, the tree did grow in a tangle-like way from straight lines with little plan but to bring them together toward the bottom. I also like the 'wind' in this one, and may use that more when I need a 'light' filling tangle. Unlike most free-form patterns, this one came pretty easily and is easy to morph around existing features. 

This was the first response to the challenge. Of course the web needed the addition of beads as a take on the tangle pattern "Beadlines".  I tried to come up with a random spidery pattern by drawing random intersecting pencil lines. In each space between lines I added a circle and 8 lines roughly perpendicular to the circle that radiate out toward the boundary of that space. Once the spaces each had a spider I erased the lines. It might be more effective if the lines were in black also.  I don't think it is quite 'there' yet but could be cute. The rest is obviously inspired by sections of a pumpkin, although this is not the best rendition of it. I like the swirls as the pumpkin tendrils. 


In addition to this week's challenge, the Diva has posted a most excellent giveaway to celebrate 200K hits on her site. I highly suggest you go here to check it out! LOTS of great Zentangle goodies and it is super easy to enter. 

I hope this is the start of a great month for each and every one of you. Thanks for stopping by.