Showing posts with label design wall. Show all posts

Sunday, June 21, 2020

Quarantine Quilting

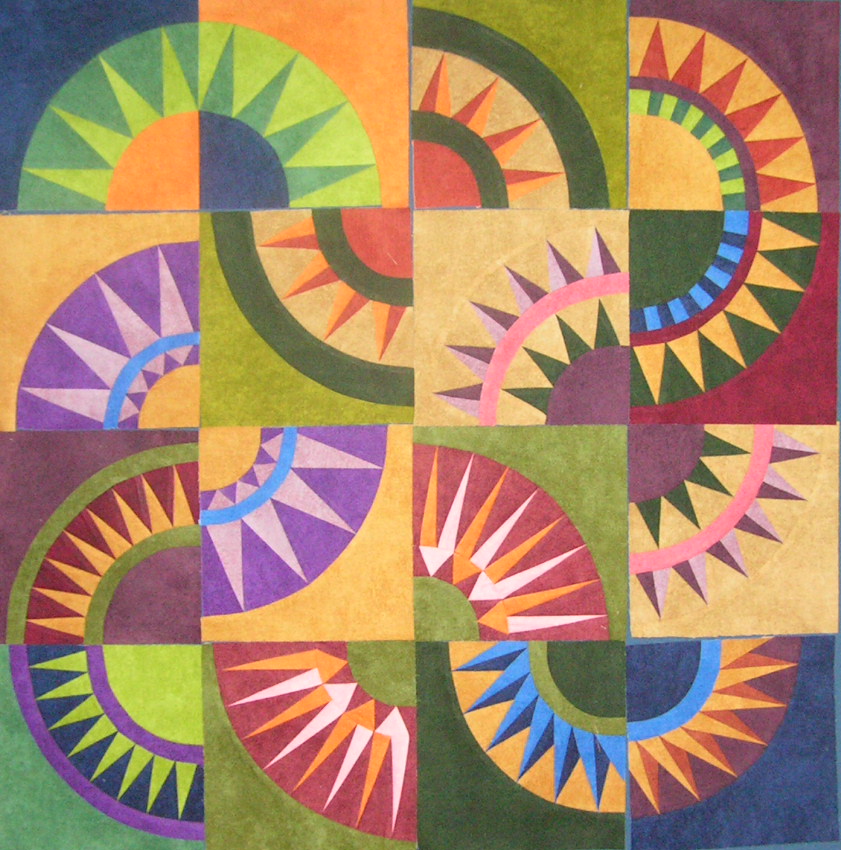
    It’s been three years since I posted on this blog and it took me a bit to even recall HOW to post (don’t count your chickens, it’s not posted yet). I thought of the blog in the first place mostly because I was working on a quilt project from the past (WAY past) and I wanted to know when it was that I started it. I knew I had posted a few times about working on it because it was sort of following along with a group that was doing New York Beauties, so I started poking around. Turns out that it was April of 2012 that I started the project. This is the original post. Well, I finished 16 blocks at the time and it hung on the design wall unfinished for 8 years while I got my MAT and started teaching high school - that was pretty much the end of regular blog posting. 
    Of course, this spring everything was turned upside-down with the stay-at-home order and teaching classes from home and generally not going anywhere.  Like many, I have had more time at home than usual. I spent some time organizing the sewing room, filing and sorting fabric, and due to this strange new world, making masks with some of that cute ‘orphan’ fabric not suited to other planned projects. I also have been working on some of those old projects, including the one that was still hanging on the design wall that I mentioned above. It now has its borders and has been quilted. The irony is that the borders themselves required 12 MORE NYB blocks in a tiny size that I had to draft the patterns for myself. I guess I remembered how to do it alright (actually came up with a new system for organizing all the tiny paper pieced parts that works great) because I think they turned out rather well. The next task will be to make and apply the binding. 
Back on the design wall after quilting because I am used to seeing it there by now! 

This was while I was marking the quilting lines

This is the back of the quilt with the label. It is interesting what you will resort to when trying to use up some of the yardage in the original set of fabrics for this quilt, in this case a set of Quilters Candy semi- solids. 

This stormy blue and grey and sea green lovely is a quilt top I put together from a set of fabric I set aside even longer ago when I made an identical baby quilt (for a kid that has likely graduated college by now) I always loved the quilt and wanted to make another just like it. When I was going through fabrics stacks In April I found the set and the printed panel and figured it was about time.  I have no babies in my life at the moment to make it for, but I finished the top, made the backing and binding and they are all hanging together in the closet with all my other flimsies, awaiting the right occasion for quilting. 


I have many more projects on that to do list. Maybe I will keep a record of things I am working on, as an once did, so that when I finally get around to finishing them I will have a place to go look up what dates to include on the label!

Monday, December 10, 2012

A NEW holiday project... Yay!

Oh Brother! I have a holiday wreath project half quilted. I have a winter/holiday top with backing all ready to go. I have two quilt tops that need quilting for the show deadline in March, one has a back, the other has a back design. None of these much delayed projects will likely get done before the holiday because I have decided that I need to use up the last of the fabric remnants from making the children's stockings. I love this fabric. I bought plenty of it 12 years ago when I made my first child's stocking. I knew I would have lots left over to make the next child's stocking, and the next if it ever came to that. I have made three from the set and that is all I will ever need. All different block patterns, all different backing and cuff material with the same lining. All have solid cuffs of different colors and all sport merry sounding bells.


My husband does not have a stocking from his childhood. As nearly as I can tell his family got new, plain  stockings every year from Santa. I still have the one my mother made for me... a red felt 'french boot' trimmed in lace with my name on it. It is elderly now and worn and I am afraid that Santa will tear through the thinning felt while stuffing in my surprises (because I am always SO good!). I have decided to make two stockings for us from what is left of the childrens' stocking fabric. His will be made of equilateral triangles (3 sides = 3kids) and mine will be made of rail fence blocks (three rails = three kids, two rails of one value = two boys, one rail of a different value = one girl). Ours will have some of all of the fabrics contained on the fronts of theirs, plus some of each backing. I hope to have enough of the lining to do both. I may make the backing of mine out of the actual pieces left from when I made the kids' and his (yes, I still have the extra squares I cut 12 years ago). I may cuff both of ours the same so they will match when the kids are all gone and have taken theirs to their own holiday hearths.


The one on the right is sewn together and needs just a smidge more at the top which I will add with a plain strip as that will be hidden under the cuff anyway. The one on the right is still in the lay-out stage. Already I see two blocks that could be swapped and I will likely need a few more once the seam allowances make this number shrink up a bit. I hope to be able to share the finished product some time before the holidays have come and gone... but you never know with me... I may come up with ANOTHER project that needs to be started immediately! (insert eyeroll here!) To see what other holiday wonders people are working on this week check out Judy's blog at Patchwork Times: Design Wall Monday.

Monday, December 3, 2012

45 minutes

45 minutes... that is how long I have spent in the sewing room in the last month or so. Maybe its been twice that much. I went up there some time back to quilt on a holiday project I want finished and found a few scrap 9 patches I wanted to do something with because they look wintery and got involved in that. I got two of 6 blocks done then and had to stop. Its been at least a full month since then with no action and I managed 45 minutes up there this morning and finished the next two blocks. Now I have no idea what to do with them, haven't made any headway on finishing the holiday project, but the sewing machine and iron were turned on and actually used today so I think that calls for a Design Wall Monday post! What have you been up to this week?

Monday, October 22, 2012

In my lap...

There is no real  Design Wall for me today... I have something in my lap. I am finishing the binding on a top I made long ago for my nephew's new apartment. I would like it done so I can send it in time for, or close to his birthday which is coming up next week. This is the top...


I backed it in mottled light grey and it is being bound in double fold bias that matches the outer border (I can't believe I saved that fabric for about a decade to go along with it when I finally finished it... such optimism!) I will save the details of the quilting and post a photo of it REALLY done, hopefully for a Finish Friday this week! See you then!

Monday, October 1, 2012

My Monday Design Graph Paper

It finally happened, I had an idea for the back of my crumb quilt (what a cliche... I was in the shower at the time)! The front has been done for a long time. I think I know how I want to quilt it and I knew that I wanted to use certain pieces of really old calico fabric in the back in the spirit of 'use it up' but I didn't want it to be really ugly... I will make the back like one of the blocks on the front, only bigger and sort of a combination... a wonky heart inside a wonky star...

what do you think? Sort of 'giant crumbs'. Now I have to see if the pieces I have in mind are big enough and if I have enough gold for the heart, it is called "Hearts of Gold" after all.

I also finished the last 7 pillowcases for my friend's pillow case drive for the Mattel Children's Hospital at UCLA. I posted more about it here.

The top princess one (the upside down one with the pink ribbon trim) is going to my daughter since I promised her her choice of the princess ones. At least she picked the one that I sewed together with the princesses standing on their heads! I love the Aunt Lindy's Paper Doll ones, I used up the scattered clothing fabric I had for the cuffs and bought the yardage for the bodies in the clearance section of the LQS. It is an older line and I was lucky to find it - I thought I might have to make do with a plainer pink or blue. The ones below are the set I finished on Friday. So I have 12 cases to send to Sara for the collection she is making in celebration of her daughter's (too short) life. Hopefully her collection for the hospital will help to cheer other children who have to spend too much time there.


Gee, I haven't done this much sewing in many weeks... can you tell I am procrastinating! Back to work! If you have some time check out the other great quilt designs swimming around over at Patchwork Times' Design Wall Monday.


Monday, May 14, 2012

Monday, Monday

Good Monday, everyone!  I had lots of time for sewing this weekend (thank you for a day off mom duties for mother's day), unfortunately I didn't actually finish anything. I am beginning to think I have a real problem in this department. Partly the culprit this weekend was the super clearance batik precuts I ran into on Friday. I mean, 22 2.5" strips of batik for $3.50 I just couldn't turn down. I even knew what I wanted to try with them and started cutting almost right away on Friday. I have one set all cut up and sewn together (I bought three) and found some strips I had left over from a different batik project a while back and cut those up for a little more variety and incorporated those as well. I don't know if I am going to have time to work more on this before the end of the school year for the kids, all that cutting is tie consuming. I think I like where it is going, although it is still a little hard to tell at this point. I am using Judy Laquidara's free Peaches and Dreams pattern - although this looks NOTHING like her original!


I suppose I have decided on the final layout for the New York Beauties. I should have worked on getting those sewn together and decided on some borders, but I didn't. They are pinned and off the wall next to the sewing machine - maybe later today.** Edited to add a natural light photo of the blocks all pieced together Yea! it is all together!**


I did get the HST quilt I have posted about before all pieced together. Now I need to decide what I want to do with it. It does look smart all sewn together and the secondary pattern of diagonal stripes really comes out more strongly than it did before it was all condensed. Any suggestions for additions to this one? It is only 36" x 36" as it stands and I think it needs more, but I can't think of anything that would still allow the HST's to be the focus. What about a total departure from the pieciness of the HST's ... like a band of houses and trees and town buildings all facing the center... call it Cross Roads or Town Squares.


I also pulled a fabric out of the stash that I have been saving for a One Block Wonder wall hanging, got it cut up and got all the hexies sewn in halves. This one I will take with me this summer to play with the placement. This was a first shot just to see what I have. I wish I had more, although I was so grateful to only have this many when I was piecing and pressing them last night! I also have a fish one all in half hexies that I may take to play with too. It just never got put together. I have a little more of this fabric, maybe two repeats worth and three fabrics that are the colors contained in the print so I should be able to put something together.


So that is what is up on my wall. I need to get busy cleaning the house and doing the laundry and beginning to get really organized for the migration in a few weeks. Check out lots of other great design walls over at Patchwork Times.  Have a great week.

Monday, May 7, 2012

Designs on Monday

Wow, the spring is really moving right along isn't it? I have only a few more weeks to go before we pack it all up and 'migrate' for the summer. I taught a science club class about migration earlier this year and one of the things that inspires animals' yearly migration is the search for more hospitable weather. My son piped up at this point and said "So you migrate in the summer to get away from the heat?" The answer to that would be a resounding YES. I am NOT a hot weather person and if I stay in the south for the furnace-like months of midsummer I am not a person that anyone would want to be around. My husband understands this from experience and does not grumble too much when I pack up the kids and head for higher altitudes and a cooler, drier climate. Missing the 'me' that would be here in the summer would be like pining away for a half-crazed wolverine.
That being said, I am also away from all sorts of media... we have no TV, internet only at the library in town and, while we have a phone, I try my best to ignore the fact - we never had one when I was a kid and I keep it on a high shelf so it is easy to ignore unless it rings (and when there is a thunderstorm since the electrical activity in the air makes it sort of half-ring. We usually call out "storm calling!", it is sort of a standing joke.) We also have very little room in our cozy cabin and what room we have is shared and multipurpose. That all adds up to 'no sewing machine, no room to sew' and 'no posting on ones blog'. So sad, but true and worth all that I gain like lots of screen-less time with my children, lots of time for imagination and hiking and relaxing and nature.
So, I will spend the next few weeks preparing a few hand projects to work on while we are out there. The modern quilt I am appliqueing a border for should be high on the list - I did two of the three borders last summer and have only managed half of the third during the rest of the year. I hope to have it finished when we return. I also want to take the materials required to make the last My Tweets block so I can sew those into a top. Perhaps I will be ambitious and take what may be needed to make, er, begin and applique border for that as well. We shall see. So this is what is on my wall today.


In the mean time I would like to finish putting this top together because I doubt that all the blocks would still be clinging to the wall after a summer's worth of air blowing on it from the nearby vent. I believe I fixed all the placement issues for the blocks and sewed them all into rows together last night. Now I need to press and sew the rows together. I love this method of sewing a place sensitive top together... everything is connected by the threads that go between rows at each seam and there is no chance of getting things backwards back up on the wall.  I think I will keep this one square... maybe make a few rows of something around it to make it bigger... maybe I should pack some graph paper as well. These blocks are only 6" finished so this center will only be 36" square finished. 
I also finished amending a set of blocks for the NYB project I have been working on. They are still not my favorite blocks but that is as much re-doing as I am willing to do on them and I will live with the result.  Now I need to make some decisions about final placement. I thought I had my scheme all worked out, but figured I should at least give other layouts a chance. The top one is my original, the second is another possibility. I kind of like that one... which is your favorite? And am I crazy enough to make a pieced border? What about just NYB block corners and a striped border? I may leave those decisions for the fall unless I am inspired. No use rushing things (I have to chuckle at this... the thought of me rushing and actually getting something finished in one push is almost unheard of!) Ugh, the color is really washed out on these. My flash does this and I usually avoid that my taking pictures in natural light. The wall does not get much natural light and today it is dark and stormy so I have even less to work with. Forgive the washed out look and imagine instead vibrant intense jewel tones.


Do you see those two pink and orange blocks that have 8 rays, 4 pink and 4 orange? Those are the ones that were amended... the inner ray band is different in the second layout. That is the final form... I wish I had done the light pink rays in the darker pink originally, but it did't seem to have enough contrast. Unfortunately the light pink has TOO much and I don't have any of the background fabric left to redo them (and I am NOT picking out the tiny paper piecing stitches!) I may play around with which sets of blocks to use in the center together, but I like the 'order' of the configuration.

Finally, on the wall today are the first 5 blocks of a one block wonder wall hanging that I want to take with me this summer so I can play with the placement... we like to do puzzles on a rainy day and a one block wonder is certainly a kind of puzzle! I have done the cutting and was leader-endering these together while I sewed blocks together for that HST quilt above. 


To check out what is on other quilters' wall today hop over to Design Wall Monday. Have a great week!

Monday, April 30, 2012

A new week, but no new projects!

That should be my mantra... NO NEW PROJECTS! But I have made a teensy bit of progress on a current project. After sleeping most of last week because I was sick and finishing a queen sized quilt the week before which will be given to its new owner this week it was high time to get back to the New York Beauty project! So I finished up the second of two pink and orange blocks that I am still not sure I'm wild about and chose colors for the last two blocks of the set of 16.


Yes, I broke out the color wheel for this one because I apparently can't come up with a nice quad color arrangement beginning with purple without a little assistance. I even got a good start on them last night watching TV over the top of the couch... I could get used to this 'sewing machine in the living room' arrangement I have right now. I have a small composite board sitting on a milk crate to my left with some batting and muslin and my mini iron for the pressing and a tiny bit of cutting board space just to the left of the machine. Aside from being pretty cramped it works great for sewing in the evening after the preteen who shares my sewing room has gone to bed - with the added bonus that my husband does not feel abandoned (just ignored! ;-) ). 
So here is the progress on the last two blocks...

And the whole things as it is so far


My least favorite blocks are the pink and orange 8 ray pair that are opposite each other... I think they might be too light or something. Maybe I should replace the current green center with a darker green of the same hue? Would that help? I think I am also not a huge fan of the super narrow rays - I much prefer the 4 or 6 ray blocks. This pair is also one of the only blocks that does not have a solid band between the main rays and the center... maybe that throws things off. What do you think? Should they stay? Do they add something needed to the set or should I rethink the pattern for that spot? I was also not thrilled with the way they went together... too many areas that won't iron flat and lots of bulk at the join between the 8 rays and the 4 rays.- there are no actual puckers, but those areas won't press nice and flat. 

So there is my design wall today. What does yours look like? Check out Design Wall Monday over at Patchwork Times to see what everyone else in blog land is up to this week. 


Monday, April 16, 2012

More Beauties

I have been plugging away at my NYB blocks. I need 4 more to complete the 4x4 layout I have in mind right now. The colors are becoming a little more challenging because I have some restrictions set by what has been used already and how to make it balanced and right in the layout I have in mind. I will need one set of two from one pattern that are both colored the same, and one set of two from another pattern that are colored differently to complete the scheme.


While piecing these blocks I have managed to complete the set of HST blocks for another quilt center (right) and border a little mini that was trimmings left over from something else. Yea for efficiency!
To see what other industrious quilters are up to today check out DWM over at Patchwork Times. I am off this morning to pick up the teacher quilt I have posted about from the long arm quilter... I am anxious to see how the quilting has come out. Have a great Monday.

Monday, February 27, 2012

More of the same... and that is a good thing.

Oh my, its been a while since I've gone a whole week with no time to post... I've been busy sewing so that is a good thing!  I have been working on this teacher gift quilt to try to get it done so I can drum up interest from faculty and staff and parents. I would love it if they would be willing to "go in together" on this retirement gift so I can have it professionally quilted. It has gotten quite large.

To the right is what it looked like Friday night. I had a big sewing day planned for Saturday that never happened due to bailing out an absentminded and less than totally organized 11 year old, but that is another story. I worked a little Saturday night and a bunch Sunday afternoon and evening and this is where I stand now, after adding 3 borders this morning. Those borders look plain, but they are actually parchment colored with about 16 point Time New Roman capital letters scattered all over it - very appropriate for a teacher.

It needs one more border with a single 'light' block in the upper right corner to make the numbers come out right for the student names from 13 years of teaching 2nd grade. I have one made that is very low contrast so it won't stand out too much.  The vine and leaves will extend all the way around. I am not sure that will be the final arrangement, but something like that. What do you think, alternating leaves like it is, or opposite? Should the wave of the vine be longer? I would like to add a few flowers to give her fellow faculty a place to sign if they want to. What style flowers? I am thinking a pretty primitive look similar to the red flower on the left. Any suggestions?


So that is what I am up to. Keep your fingers crossed that I have enough of the green fabric to make the vine... I did the calculation but it seems like a ridiculously small piece of fabric yielding an unbelievable amount of 1" bias strip... I am skeptical. To see what others are up to head over to Patchwork Times for Design Wall Monday.

EDITED TO ADD:
Oh, oh, I just did a little trial on a scrap piece to see how I would do a bee buzzing around a flower...


Squee! I am in love with this little guy! I definitely need some tear away stabilizer before doing too many more of these. Oh, and this gives you a better view of the border fabric. That is all, nothin' else to see here citizens...

Monday, February 20, 2012

Yay! Some Progress to Report on an Actual Quilting Project!

Don't get too excited... its not like it is on the "Finish Along" list for this quarter or anything, it is actually a new, high-ish pressure project with and actual due date and other people depending on me getting it done. Ack! Perhaps that is why there is actual progress to report!

I posted a previous design wall Monday about a quilt based on 9 patches that I had begun with some left over 4 patches. This is what it has grown into, mostly over this weekend. I still need to do some figuring but I think I am about 18 blocks from finished on this one. I am also thinking that it needs a border with a waving vine and some machine applique, possibly raw-edge leaves to soften the patchiness and angularity of it all.


Ultimately it will be 8 blocks high and 7 blocks wide, beginning and ending with a 'dark' row of blocks left to right. The border will be in the neighborhood of one of the darker gold/tans in the neutral and the proposed vine would be a nice solid dark green, to the forest/loden end of green. The leaves added to the vine will be scrappy to echo the central part, but not all over the map... mostly darker colors. Note that I am not totally in love with this quilt yet. It seems like so much chaos. I have tried an alternating layout but that is much more chaotic. Any suggestions? Other possibly layouts? What about concentric 'circles' of dark and light rather than rows!? I just now thought of that... let me run upstairs and try it.

TADA!

Oh yes, I think I like that one better... with the additional dark row on the right and the blocks at the top required to complete it. Do you think that looks better? Especially with a gently curving vine winding along the border? It changes my numbers a little, but I don't think that is a deal breaker at this point. Gotta love looking at a design through the lens of a camera to change your perspective.

The idea behind it is that the recipient has been teaching at the same school for something like 15 years and is retiring this year. I wanted a 2" light square for every student she has taught during that time. I will get the students I can find (like my son's class) to sign their first names in a square and I might be able to muster the help I need to write the names of the others (taken from past year books) in the rest. I still have some work to do, but it is coming along and I would be happy to hear some feedback on this one, as I am far from confident at the thought of the end result. What do YOU think? To express your insightful opinions on other people's current projects head over to Judy's Patchwork Times Design Wall Monday post.

Monday, February 6, 2012

It's Still Monday!

But just barely! I took my design wall photo earlier today while I actually worked on the project up there! For a whole hour!  But that was only after cleaning up the three year old's room and putting some laundry away, and before making lunch and teaching a science club class after school, making dinner, ruining 4 petri dishes - tell me what good are petri dishes you can't sterilize by boiling? - replacing said petri dishes at the local school supply store and filling 6 of them with nutrient agar all the while coaching an 8 year old through the design of an 'incubator' made out of a cardboard box, a heating pad and a wireless thermometer that usually lives on the front porch and tells me if the kids need a coat before heading to the bus in the morning. Wow, that was an impressive run-on sentence! This project is on my quarterly To-Do list for the Finish Along, so I am proud that I am actually working on it. Sadly, I thought I needed only two more blocks and maybe some borders but...


...after finishing those two I think it is still an odd proportion and really needs another row of four - each block is 12.5". I have enough fabric for the backings and I think enough for all the sashing strips I need - it is a QAYG string quilt sewn together with narrow strips on the front and a folded strip on the back that flips over and has the folded edge sewn down later - similar to binding. I will have to look at the yardage I have left next and decide. I am thinking about a border of the fireworks fabric on the left... still no decision there. This is a charity quilt that was never finished when I still ran the quilting group at my church. It will go to the county foster care group who will see that a foster care child will have a little something to call their own, even if the bed they sleep in is not technically theirs. I think the cute little baseball theme should fit right in for a sports loving boy. The black stripe fabric that runs down the center of each block is also the back of the quilt.


To see what everyone else was up to today, jump on over to Judy's Design Wall Monday post - those little thumbnail photos are always so enticing... little windows into other quilters projects and processes, successes and challenges. Have a great week.

Monday, January 30, 2012

A New, Old Project...

OK, this week's design wall is pretty much the same as last weeks... I am about 80% finished cutting out pieces for the Tweets I had posted last week. Little sewing went on this weekend... we were gone for part of it, and the rest of it was trashed for sewing by a hand injury. The good news is that the hand is not broken, just swollen and sore so I can sew at some point this week if I get time.
Late last week I stopped by an LQS and ran across some of the Aunt Lindy's Paper Dolls fabric on clearance. It was the scattered clothing print. Seeing it (and OK, buying some of it) reminded me that I had purchased a kit of the doll fabric with some Fast-2Fuse stiff double sided iron-on interfacing and some Pellon iron on fleece for the clothing back in September at the quilt show. I was supposed to give it to my 3 year old for Christmas! Ooops! So I sat down to listen to my book on CD on Friday and ironed away.  I sealed the edges with Fray Check after cutting everything out and the kit included some cute butterfly backing fabric for the stiff dolls.
I did the final trimming in the car on the way to a scouting outing on Saturday and my daughter has been having fun playing with them since (like while I got X-rays of my hand this morning!).


original panel

ready to fuse

Meet Martha, Peter, Ruby and Helen (left to right) is some of their finery.

For what other's are up to, check out Design Wall Monday at Patchwork Times.  

Monday, January 23, 2012

Picking Up Tweets again...

No, I am not talking about electronic communication - like anyone wants to know what I had for breakfast or how long the ENT had me on hold (although I will tell you that I organized the plastic-ware cabinet while I waited)! I am coming back around to work on the My Tweets 2011 BOM from Erin Russek again. I got a block behind over the summer and never really recovered. Back when I began last year I thought that I would likely only end up doing 9 of the 12 and not doing the center block, although it is lovely. Then February's block took a color turn I ended up not liking - my color choices, not hers. Then I was not super fond of a couple of the patterns in the fall and was about out of my Kona background fabric and I just let it drift for a while. Well, last week's winter sale inspired me to buy more of the background and I have browsed the patterns and decided on three more to make to arrive at 9 blocks - plus the Feb block that doesn't quite fit with the rest. Now I need to decide on colors! This is the hardest part.

My scheme is as follows... all bird bodies are a brown/tan, the wings and under-wing parts are two shades of a color and the 5 tail feathers are the same two colors plus a lighter brown/tan than the bird body. The flowers are whatever goes with the bird color. These are two of the set of 6 I have so far...


 I have two blocks with blue as the bird color, one with red, one with purple, one with teal and one with orange. This block's bird will be dark purple. My quandry right now is what color to make the flowers. They have three outer petals of one color and two inner petals of another and a center - which could be green now that I look at it. The berries will be a darkish burgundy to match the intensity of the dark purple and dark brown I am using for the wings and bodies respectively. Neither the pink and blue or the pink and yellow combo is grabbing me... and I am not sure the pink goes with the deep red either, although it does go with the purples and lightens things up a bit. I think I like the yellow inner petals, but maybe I need a totally different color for the outer petals? Something of a medium value, that coordinates with the yellow/gold and deep red and purple. Back to the color wheel! Any suggestions? And should the green be a schootch darker?


To see what other quilters are up to and what other design problems tax their creative minds hop over to Design Wall Monday at Patchwork Times. Have a great week - mine will be busy!

Monday, January 16, 2012

Designing progress

WooHoo! I will admit that the first photo is what WAS up on the design wall this weekend - borders for the crumb quilt, Hearts of Gold. It is now FINISHED (the top anyway) but I will wait to reveal the whole thing until the BIG reveal of all the crumb quilts from Jo's Crumb Along on 1-31-12. I hope to have the back made by then and maybe even have it layered, although I doubt there will be much quilting done on it.

I really need to figure out how to take photos of my wall without the flash washing out the colors!
This is a little TEASE photo of one corner of it but you will have to wait until the 31st to see the whole thing (and for me to get a decent photo of it since this one is back-lit and you can see every seam allowance!)

What is on the wall right now is the beginnings of a quilt I am contemplating making for my son's teacher for her retirement at the end of the year. If I plan it right I can have a light colored square for every student she has taught in her many years at our school. It is still in the planning stages and it looks a little odd the way I am putting the 9 patches together because I am working out of my drawer of full and partial scrap 4 patches and 2.5" strips.  We will see what comes of it, maybe  a charity quilt if it does not come out right for the retirement gift. 


For more of what other's are up to this week, hop on over to Patchwork Times and check out Design Wall Monday.

Monday, January 9, 2012

Uncovering the design wall...

There has been a lot of reorganizing in the sewing room going on since the holidays in order to give my 11 year old a more organized space since half of it is his room. I hope to be able to eventually close the closet door which will free up a few more inches of the design wall! What a goal... 'close the closet door' (shakes head).

In the mean time I have a bunch of clear floor space and have managed to layer and baste a mid sized quilt top and backing (the Christmas Wreath from last month) and am working on the backing for the next quilt. This one is a pattern called The Winning Hand... it uses Card Tricks blocks and I used winterish fabrics including an adorable snowman print for the borders and corner stones. It was made in 2005 when I was teaching this pattern in the JoAnns Quilting 101 class.


I like to use up the left over pieces from the top in the backing these days so I made some blocks in order to extend a remnant piece of gingerbread men I bought for the back. I am going to force myself to ignore the fact that the rows of  gingerbread men are not straight with the grain of fabric... it is only the back of a quilt right? Now I need to figure out how to get everything to work together and be the right size. The toughest part is making the backing large enough without getting the blocks too near the edge where they might get cut off when lining everything up during the layering and basting process. It would be so much easier if you could just make the back exactly as big as the front and have everything perfectly lined up! I think I made too many blocks and will have some left over unless I just sort of throw them together - ugh, I hate left overs, especially cute ones. One of the blocks is the lable so that one certainly needs to go in. I also have lots more of the tone on tone cream shown down there by the windmill blocks in the lower right to fill in around the other blocks. I may put another stripe of that down the left side of those windmill blocks and trim some off that large gingerbread men section so I have a strip of that to go somewhere else to balance things out. Really I think I am obsessing about the quilt backs a little too much lately... I am sort of making another top without adding to the unquilted tops pile, and not buying new fabric and not wasting existing cute fabric at the same time!
All the elements together... minus two extra blocks that may not fit
this little guy is in a reflective mood... maybe  he sees the thermometer rising

For more of what other's are up to this week, check out Design Wall Monday over at Patchwork Times.